How to Create a Campaign (aka a Sponsored Event)
|
1. Create a
"Campaign" |
>>>
|
2. Publicize
or sell |
>>>
|
3.Sagepoint sends
you $$$ |
Follow the instructions below OR Click here to watch a Video.
Create a Campaign (aka a Sponsor Sign-Up):
Enter the basic
info:
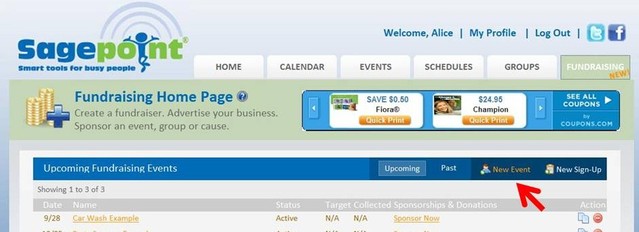
1. Login to your Sagepoint account and click on the "Fundraising Tab."
2. To start from scratch, click on the "New Event" Icon to create a new Sponsorship Event.
OR To use one of our examples as a starting point, click on the example to "View" it. Scroll to the bottom and click the orange "Copy Event" button on the lower left. Examples can be found at sagepointers.com/using-sagepoint/examples and include Annual Spirit Ad Example and Annual Fun Festival .
|
3. Fill in the information about your Campaign Event, i.e. A few sentences about your group and what you're raising funds for.
For the date, enter the day you'll start allowing sponsors to purchase listings as the Start Date (the default is the current date). Enter the last date you will allow sponsors to purchase listings as the End Date - sponsor information will continue to display after the end date, but no more purchases will be allowed. Check the "All Day" box. 4. Scroll down to the checkboxes. Uncheck "Include and RSVP" and check the "Fundraising" option. 5. Click "Continue" |

|
|
Define your sponsorship levels
In Step 2, you will see default names, prices, and benefits for the sponsorship levels. If you are happy with the defaults, leave them as is. If you would like to make changes, do the following: 1. For fewer levels, uncheck checkboxes in the left column under "Enable" until you have the desired number of levels.
|

3. Optionally fill in the "Fundraising Goal" and check
the "Show goal to participants" box. If you check these, people will be
able to see the status of your progress on their "Fundraising
Tab".
Donations: A donation option is displayed by default for every Fundraising event. To turn off this option, open up "Fundraising Options" and uncheck the checkbox.
Notify potential sponsors
1. To have the system automatically send e-mail notifications to potential sponsors, add their e-mail addresses to the "Invite Sponsors" field and click "Add". (Note: You can cut and paste a comma or semi-colon separated list of e-mails all at once.) The e-mail will include all the date, time, location, organizer, and contact info you entered as well as any text and images you entered in the "Description" box. It will also include a link your recipients can click on to see the online "Event View" and respond.
- For the basic case leave all the "Fundraising Options" at their default settings.
- If you're not ready to publicize the info yet, click "Save Draft" to save everything and come back later.
2. If you are ready to send, click "Done Adding Sponsors" to go to the final step, "Invite Guests". In the basic Sponsored Event case, "Sponsors" and "Guests" are the same and you will see all your sponsor e-mails listed in the guest e-mail field. (For advanced users, there are options for separate lists and delayed send options.)
3. Optionally check the boxes to select features under "Invitation & Response Options" and "Reminder & Alert Options"
4. Click "Save & Send"
There are several other options for publicizing your fundraiser and notifying potential sponsors as well. Click here to read on -->
If you're ready to get started, Click here to go to Sagepoint ->